Sunday, December 18, 2011

Curb Appeal - My New Front Yard

After two long years of being extremely embarrassed by my front yard, I finally got my act together and for Christmas, I got a new front yard. Best gift ever!

Before & After
Click on any picture to see a larger version. At the end of this post are the super before pictures from the day I bought the house.

My yard before, complete with dead rose bush (I purposefully killed it).

My yard after. The sun is kind of blowing out the detail, thus the additional picture below.
 
My yard after, taken in the morning with less sun so you can see better. All the green, leafy plants in the lower corner are Day Lilies and will bloom with yellow flowers.

I'll post a picture of my yard again in the spring/summer after the plants have matured and/or bloomed. Some of them are dormant right now, and to stay within my budget, it was cheaper to get less mature plants that would grow into the yard.

History of the Project
I've had a beautiful plan for my front yard, including an awesome deck proposal, thanks to my friend Krista Percival (kplandscapedesign.com) that she designed for me right after I bought the house, but the few times I got quotes on implementing the plan, it was way outside my budget which was disheartening and why I never got anything done. If I intended to live here for 10 years, it would be easier to spend a lot of money on my dream cottage yard, but I don't think I'll be here more than 5 years (something I didn't tell Krista), and 2.5 years have already passed. So I needed to get something that looked nicer than dirt and weeds and incorporated the types of plants I like, but wouldn't cost more than $3000. When I graduate from my starter house to my for realsy house later on in life, I will definitely get a full-blown Krista Percival design though!

Luckily I found out that a friend of mine, Jeff Raymond, who recently moved to town, does landscaping and he gave me a very fair deal.

Aa web designer myself, I hate to say my yard is a modified version of the original design Krista created, because really it's quite different and I know Krista would agree this isn't her design - so lets call it inspired by the original plan instead. We used the same plant types and some of the layout/placement, but this is truly the budget version of what Krista originally envisioned. Plus the addition of a dry riverbed, a feature I'd become fond of in the past 12 months or so and thought would work well in my yard.

Another angle. The rocks in the front corner are
b/c the street floods that corner of my yard
every time it rains. The tree is a young
crepe myrtle.
Time Frame
In one weekend Jeff got 90% of the job done, and would have gotten it all done except the rock yard for my dry riverbed was closed on Sunday (even though their website said they weren't).
The Plants
One way we kept cost down is to reduce the number of plants, and even still, it was almost $1000 for plants. Another way to keep cost down, as mentioned, is to buy younger plants rather than fully mature ones. So it will take a while for them to really grow in, but that's okay.

There are two trees, an angel's trumpet, which is the yellow one by the window (we wanted to get the next size up, which would have been in a box, but all the super mature ones were gone everywhere because they're blooming now and in high demand. But that saved me about $100).

The second tree is a crepe myrtle, near the front corner by the driveway, which will bloom a dark pink.

The angel's trumpet got a little frost bitten
but it will recover. Believe it or not, it's
cold in San Diego in December!

I think there are about 50 plants in the yard. All the plants are the ones Krista originally had in my plan; she spent a lot of time with me learning what I liked and figuring out the best plants that would require the least water. Some of the plants the nursery delivered, especially the ones in 5 gallon pots, were a little on the tiny side. But they'll mature and grow in over the year.

I linked the plant names to Google Image searches so you can see what things will look like when they bloom/are mature.

  • Hemerocalis Hybrid - "Yellow Day Lilies" - they'll be yellow when they bloom, they're the green leafy things along the front and by the mailbox
  • Kangaroo's Paws - love these; they're the tall, slender yellow and orange plants)
  • Lantana - the red and yellow,  and purple varieties; they don't look like much now, but that's b/c they're dormant
  • Salvia Leucantha - "Mexican Sage Bush" - another fave of mine; along the wall under the window; these will grow into bigger bushes
  • Rosmarinus Officianalis - "Rosemary" - smaller purple clusters strewn about the yard
  • Feijoa Sellowiana - "Pineapple Guava shrub" - these are the bushes on either side of the house
  • Coleonema Pulchellum 'Sunset Gold' - the small yellow, spiky ones stewn on either side of the yard
  • Polygala - "Petite Butterfly Sweet Pea" - the two shrubs on either side, near the middle. These will have tiny purple flowers.
  • Aeonium Schwarzkopf - succulents - my original plan (which called for aeonium urbicum - "dinner plate"), these are the 3 at the front, and 4 next to the driveway.

I also had Jeff trim my palm tree since the city doesn't maintain street-side trees anymore. It was a huge job, but I'm so glad it's done! The sidewalk looks more open. And it's perfect that the day was dreary for my before and brilliant for the after picture.

Palm Tree before
Palm Tree after

For irrigation, Jeff installed a drip system. There are drips on every plant; the small ones get one drip, the larger get two. Each drip puts out 1 gallon of water per hour but I only need to run the drip system for 25 minutes.

The Neighbors
I was telling Jeff about how the couple who owns the rental across the street always manage  to drive by the day I've done some new work (they don't live in the neighborhood) and they're always really excited about what I've done (remove the trees, put in a brick planter and walkway, painted the house), but the next question out of their mouths is always "are you painting the house next?" or after I painted the house "are you doing your landscaping next?". And funny enough, not 10 minutes after I told Jeff about them, they showed up (they must have a survalence camera pointed at my house!). I was inside, so I didn't get questioned about my next project, although they have nothing left to nitpick since everything they can see from the street is now done. They did chat with Jeff about doing some work for them though, so that's good for him.

I'm waiting for my annual Christmas card from this couple, and dammit, it better say how awesome my yard looks. (Author's note: I wrote most this post before Christmas - I did get the neighbors' card and it did in fact say "your house looks great!").


My House on Purchase Day vs. My House Today
The true before and after =)
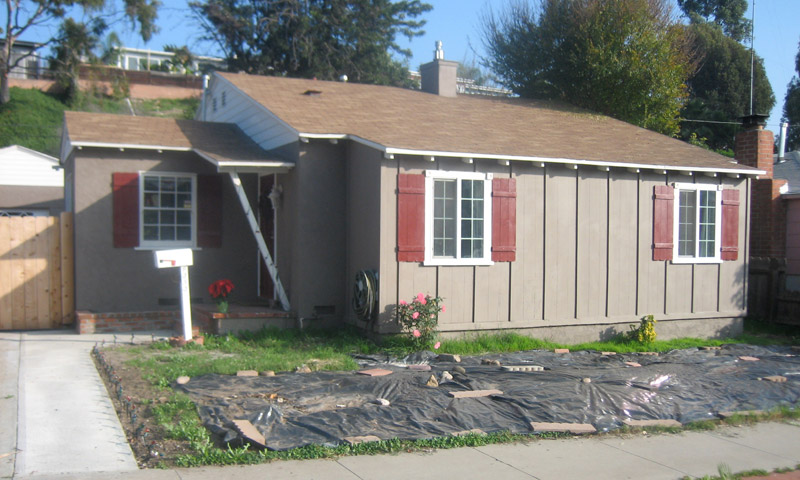
June 2009

December 2011

Next project? The backyard which is getting installed this week. I spoiled my house for Christmas this year. (Editor's Note 1/6/12: the backyard is done! Read about it in my Backyard Makeover post)

Saturday, November 5, 2011

Halloween in Rolando

   
When I lived in South Park, I used to love decorating the 4-person apartment building I lived in and handing out candy from the front stoop.
My old apartment in South Park. Sniffle....


Kids storming the South Park castle for
candy. I'm on the balcony.
Growing up I never really cared one way or the other about Halloween. But that changed when I moved to South Park. My first year, I was caught completely off guard (and under-stocked on candy) by at least 150 trick or treaters. Everyone brings their kids over to South Park for candy. Something about all the kids having fun in their costumes got me excited about Halloween for the first time in my life, so every year after that I spent at least $50 on candy and invited my friends over and we'd sit in front of the building with bowls of candy hanging out and being sugar pimps.

But when I bought my house and moved to my new neighborhood, Rolando, everything was different and my love affair with Halloween came to an abrupt halt.

My first year here, Halloween was on a Saturday and I got 3 trick-or-treaters. THREE. Granted, I left the house at 6:45pm to go set up at Adam's house because we were hosting our semi-annual Secret Apollo/Shaw Brother Halloween party (a few pics from that party are at the bottom of this post), but still, trick or treating usually kicks off by 5pm so I expected more than three. And I didn't see any packs of kids on the street as I left. It totally bummed me out on Halloween in my new neighborhood.

My second  year, I wasn't even motivated to decorate. I went 4 blocks away to Matt's house to hand candy out there. I hung out watching movies with him and his brother until 10pm and he got about 8 kids. I thought his traffic would be better because my house is very close to a main, busy street and he's nestled inside the actual neighborhood. Wrong.

This year, my third Halloween in my house, I finally got the spirit and decided to decorate. I blame Martha Stewart. I subscribe to Living Magazine and she had some really cool pumpkin ideas that didn't require carving. So I made a few pumpkins:


My batkins

Cliff, my mummykin

This required me to go to the fabric store (I had to get sewing pins for their eyeballs) and while I was there, I discovered something wonderful: the fabric store had two isles of Halloween decorations! AND it was all 60% off - 3.5 weeks before Halloween!! People who know me, know I LOVE a good Halloween or Christmas decoration sale, but I usually have to wait until after the holiday and pack all my goodies away for 12 months. So I ended up getting more inspired and spending a couple hundred dollars on new decor and pumpkins. Then I dug out my Halloween bin in the garage and attacked my front yard.

All said and done, I bought 13 pumpkins of various sizes and colors

The planter bed...I mean grave pit, by my front door
Oh no! A giant, vicious spider!

Blurry because I had the flash off and 
wasn't using a tripod, but the full moon looks
rad. That's a lighted hand coming out of the ground
With all the decorating, you would think I would have a party or at least invited some friends over for drinks. Nope. Besides me and Jackson, only one other friend (until now) enjoyed my efforts: Sara came over a couple nights before Halloween to get a drinks. And of course the people driving buy the house saw it.

I had my decorations up for 3 weeks, so I figured I did some pretty good neighborhood advertising: Hey, bring your kids here! I want to give them candy! (but I'm not creepy!!). The irony was, I wasn't even home for prime-time trick or treating - I was at beach bootcamp in Pacific Beach. I got home at 7:30 and ended up getting about a dozen kids. Way more than I expected based on last year at Matt's place and it has me excited about next year.

I made graves with mounds of dirt on my "lawn". For once my
lack of landscaping was a good thing.
I even got some some kids at 9:45 - and they weren't teenagers. They were around 8, with their dad. The San Diego Chargers had a 5pm home game on Halloween this year; I think Dad waited until after the game to take them out.
Stupid picture of me, but check out my spiders. That's also one glowing on my head. Evil Jackson and the batkins.

Monday, October 24, 2011

Amber vs. Dishwasher Installation

I had absolutely no idea how to install a dishwasher. But since I was replacing an existing dishwasher with a new one, I figured all the hard work has been done and I just need to pay attention to how the old one is hooked up and mimic that for the new one.

I now know how to install a dishwasher; next time I will pay to have someone do it for me.

After updating my kitchen cabinets last month, I decided a new stainless steel dishwasher would look much nicer than my existing black one. Plus it gets moldy inside. That could be because the dishwasher is old, or it could be because there's no air gap (what's an air gap?) through the sink which I found out from Home Depot is required in California. Luckily by installing my new kitchen faucet along with the dishwasher, there is now an air vent because I no longer need a hole for the pull out sprayer.

Old dishwasher and faucet

I did a lot of looking around at all the major appliance websites, Sears, Sears Outlet, Home Depot, Lowe's, and looked at the websites for several local dent & ding wholesales places. I ended up returning to Home Depot to buy the first dishwasher I saw and liked that was near my $500 budget. There are really nice ones if you can pay a few hundred dollars more, but I'm single and don't even run my dishwasher once a week, so I don't need a mega-washer. I did however want one with a stainless interior. Just as extra precaution against mold and stink on the inside.

I bought the GE Adora Dishwasher in stainless steel because I liked that it had hidden controls and a stainless interior. It was on internet special over Labor Day weekend for $538 (from $699), plus they have free delivery and haul away. The Adora series is exclusive to Home Depot and pretty new so there weren't many reviews, but my research enthusiast friend Sara checked with her Consumer Reports subscription and confirmed GEs have good reviews and I liked them better than the Maytags I looked at in the store (those tend to be the two brands that offer a lot of models in the lower-end price range).

How To Install a Dishwasher
First, let me state that the paragraphs above were written 6 weeks ago. I only now have just completed installing my dishwasher - and not because I procrastinated! I've literally had to do this in phases every 5-6 days and have probably spent about 10 hours on this project if you include all the trips to home depot. Knowing what I know now, I wish I had paid the $80-100 to have a professional do this. But there was something in me that wanted to prove I could be handy. What I'm wondering now, is just who I wanted to prove that to? My cat Jackson? There's nobody in this house who cares if I do things myself or pay someone to do it.

 My cat Jackson. Not impressed by my handiwork, but a fan of the new area rug he can lounge and scratch on.

That being said, here's how you install a dishwasher, assuming you are replacing an existing one:


Removing the Old Dishwasher
The only tool you should need is a screwdriver and possibly a wrench. You'll also need a bowl.

  1. First, pay attention to how things are hooked up (I took pictures, which is good since I worked on this for so long, I forgot how it was originally set up)
  2. Turn off the water supply to the house
  3. Unplug dishwasher from the outlet (assuming yours has a plug and is not hard wired)
  4. Place a bucket or bowl under the areas where you'll be disconnecting pipes.
  5. Disconnect the drain tube (mine was attached to the garbage disposal, but if your dishwasher is hooked up properly, yours should be attached to the air gap up by the faucet holes)
  6. Disconnect the waterline (on newer dishwashers, this will be a flexible tube; on older models, like mine, it will be a thin copper pipe). If this is connected extremely tight, you may need a wrench to loosen. A little water will come out. 
  7. Grab your screwdriver and unscrew the bracket mounts from under the countertop. These are located above the door.
  8. Pull the dishwasher out from under the cabinet. 
I think step 8 is supposed to be easy but in my case this is where one of my big hangups was. I tugged and pulled and the dishwasher wouldn't come out. I thought maybe it was stuck b/c it was lower than the tile on the kitchen floor. Then after letting it sit for a few days, I realized I might be able to tilt it back a little bit so I could lift the front legs over the tile lip. Well, I could tilt it, then I was able to adjust the height of the front legs and was able to pull the dishwasher out. I did a jig, then used my He-Man muscles to carry the dishwasher outside.


Installing the New Dishwasher
So the manual with your dishwasher will explain how to do all this. It will arrive screwed on a pallet to keep it stable which you'll need to remove before installing.

  1. Test the door and adjust the springs if it is too stiff or loose
  2. Remove the dishwasher from the pallette (you'll need a wrench)
  3. Attach the water line and drain hose
  4. Attach the electrical cord. I had to buy the GE standard electrical kit (about $5) and connect the electrical wires to a cord with a 3 prong outlet. Apparently dishwashers can be hardwired into the wall.
  5. Adjust the dishwasher legs if necessary so you can slide the dishwasher into the cabinets
  6. Your dishwasher cabinet should have two holes into the sink area - one for the water line and drain hose and a second to run the power cord through. Thread everything through the appropriate holes and slide the dishwasher in (haha...I wish it had been that easy for me! Much fiddling and fighting with the leg heights
  7. Once in, use a level to make sure it's level from front to back and side to side
  8. Now connect your water line to the hot water pipe under your sink
  9. The drain hose should connect to your air gap (many YouTube videos on this) and then you need to connect the airgap to your garbage disposal with a heavy duty black rubber pipe (I don't know what it's called, but if you don't already have it from your old dishwasher, they'll point you in the right direction at the hardware store. It was about $4). You'll probably have to cut the pipe down (another hangup for me).
  10. Now you're done. Turn the water supply back on, filler 'er up and cross your fingers that nothing leaks when you press start!
Reading this, you'll see the steps are relatively simple. I just kept running into small issues along the way and getting fed up and taking 4 day breaks. BUT, I now have a new dishwasher that is so much quieter than my old one that was at least 10 years old. I can listen to the tv without having to crank the volume and close the door to the kitchen (In two years, I only washed dishes while I as at home twice because it was so loud; typically I ran it when I left for work).

Final Before & After
This is my kitchen the day I moved in:

And here is my kitchen today:
I'm still impressed that just changing the cabinet color suddenly made the peach counter and backsplash cute. Or maybe my mind is just playing a trick on me so I don't try and update that too.

Thursday, October 13, 2011

No More Free Shows Through the Kitchen Windows

My breakfast nook has four wonderful windows that let in a ton of sunlight, which I love. They also look straight into my neighbor's kitchen and one looks onto the street = free show for the neighborhood when I feed my cat or make breakfast in my underwear. Well, after two years, I decided the free shows are over. It's time to put up some curtains.

I found some adorable, simple cafe curtains on Etsy.com (shown below). They were white flour sack material with red rick rack trim (zig zag ribbon for all the laymen out there).

But at $40 a pair it was going to cost me $160 for all my windows. Mama wants to buy knee socks and tights for winter with that money, not curtains!

I figured I've got to be able to make these myself for a lot less.

I figured right!

AND - I could make them without sewing, which was key.

One, I don't have a sewing machine. Two, I took sewing in 8th grade, but I transfered in from a different school halfway through the semester. So while everyone else was ended the class by a skirt or other article of clothing, I only got as far as making a pillow. Granted, I probably don't need much more sewing skills than that to hem a curtain.

How to Make Cafe Curtains Without Sewing
What to Buy:
  • 30in x 30in white flour sack kitchen towels. Target sells packs of 4 for about $3 each. I needed two packs for my windows. You could buy an extra pack to make coordinating hand towels if you want.
  • Rick rack trim. This is at any fabric store and comes in a variety of sizes, colors, and lengths. I opted for large canary yellow and bought one 9 foot spool for $4.
  • Fusable Tape. I bought a brand called Steam-A-Seam 2 in the the 1/4 inch size to work with my trim, about $3
Total supply cost for 8 curtains: ~$15 with tax.

Make the Curtains:
It's so easy, it's almost not worth explaining!
  1. Iron the towels 
  2. Lay out a strip of the fusable tape along the bottom edge of the towel (I placed mine two inches from the bottom)
  3. Cut an equal length of rick rack and lay it on top of the tape 
  4. Place the iron over the trim for 10 seconds to fuse the tape to the ribbon and towel
  5. Done
It took about half an hour to make 8 and cost me more to buy the hardware than to make the curtains (3 cafe rods and 5 packs of clip rings, also from Target, about $5 per rod and $4.50 per pack of 7 rings).

The Final Product:
It's pretty rewarding to make things, which I don't do often, and even if it was super easy.


Monday, September 12, 2011

House Facelift: New Exterior Paint, deck and walkway

This is one of my catch-up posts. Like big-time catch up since this happened in November 2010! For anybody reading this on Facebook, you may have already seen the photos in one of my albums. But this is where you get to read how crazy I am.

My house was a fleshy-peach color when I bought it. And now that I think of it, so are the counters in the kitchen - what was the previous owner's obsession with flesh-tones?!? Along with the flesh exterior, it had an accent color on the shutters and trim that was somewhere between lavender and gray. In other words, my house was ugly.
Such a sad looking house.

I've always wanted a yellow house. But during a year of rubbernecking at peoples' paint jobs as I drove through neighborhoods (I'm still surprised I never hit a parked car...), I wasn't so sure yellow or any light color paint would look good on stucco. The very front of the house is wood where an addition was put on the living room, but the rest of the house and the garage are stucco. And light colored stucco just looks dirty and cheap to me.

But I REALLY wanted a yellow house. So one weekend I found two houses in my neighborhood that were yellows I liked. I went to Home Depot and grabbed a bunch of yellow swatches. Then drove back to these houses, ran up to the corner of each and shuffled though all my swatches trying to find a match, all the while waiting for the owners to come out and ask what the hell I was doing. Luckily no one busted me, although I did get strange looks from some dog walkers. And I wasn't that quick about this - first I would check the swatch on a corner where the light was hitting, then I'd go to a corner in the shade. I'm serious about my color matching!

I then went back to Home Depot, because as I've said before, I can never go just once in a day, and got about 8 samples of yellow paint, plus two dark brown and gray colors. At this point I had already hired a painter even though I didn't have the colors picked yet. I needed the deadline pressure because I knew it would only take him about 3 days to prep the house.

He painted the samples up on the side of the garage while I was at work and when I got home, I was not too surprised to see that ALL the yellows looked terrible. I wish I had taken a picture! I distinctly remember one looking like lemon pie filling and another looking like egg yoke. I didn't like the darks either, but they looked better on the stucco.

Now I knew I had to go dark and luckily there are two houses that I pass by every time I go pick up my neighbor Matt to go surf that had similar dark color schemes that I really liked. So I once again did my creepy-neighbor paint matching technique with some swatches to determine what color their houses were, then told my painter Joe to go for it.

Here is the final result (please ignore my giant slip and slide in the front yard; I was trying to kill all the bermuda grass in preparation for landscaping which I still haven't done).

I went with a brown, red and white scheme. I love my red shutters! And the brown is a nice chocolate mousse brown that's not too dark or too light.

You might also notice that the broken cement and brick walkway next to the driveway was replaced with a cement walkway that my friend Max did for me. I also had him remove the big bush by the front door and build a brick planter. Eventually I'll put some plants in it!

I also had Max do some work on the back deck. I'd always wanted to tear off the front rails and extend the steps to open up the deck. I think it's a nice improvement. Here is the before and after of the back of the house (which also shows off the paint job nicely):


As always, for those interested in cost associated with home improvement, painting the exterior of my 1300 square foot home plus the detached garage and deck was about $3600 for labor and paint.

Monday, September 5, 2011

Painting Kitchen Cabinets Pt. 3: Before & After

First the answer to what everyone wants to know: how much did it cost and what do I need??

Supplies and Cost
I had 23 cabinet doors and 7 drawers and two very small portions of wall to repaint.

  • Paint (2 gallons semi-gloss, plus samples) - $70
  • Primer (1 gallon, oil-based) - $22
  • Brushes (Purdy) and Rollers (smooth surface) - $28
  • Wood filler, small tube - $4
  • Painter's tape - $4
  • Medium Grain Sandpaper - free, already had
  • TSP cleaner - free, already had
  • Cabinet pulls (35) - $90
  • Screws (the ones that came with the pulls were too short) - $7
  • Hinges (23 pairs) - $78
  • Shelf liner (3 rolls) - $22
  • Brush cleaner - $8
  • Cleaning cloths - free, already had
  • Tools needed: screwdrivers, drill, orbital sander, hand sander, putty knife
Total cost: ~$335

How to Paint Cabinets
As I mentioned in my first post about this project, I read this blog to figure out what I needed to do. Now let me tell you what steps were involved
  1. Remove all doors and hardware
  2. Remove old contact paper and wipe down shelves/drawers
  3. Clean cabinet doors with TSP
  4. Fill old handle holes with wood filler (only necessary if your new pulls are a different size)
  5. Sand cabinets with medium grit paper to remove finish and smooth wood filler
  6. Wipe sanded cabinets twice - once with dry cloth, once with wet cloth
  7. Prime everything (I used oil based primer and a roller)
  8. Lightly resand to fix any rough spots or strange roller patterns left by the primer
  9. Paint cabinets - I did the backs with a high quality roller and did the fronts, which have a lot of details, with a large paint brush. I did this b/c when I primed, I saw the roller left a lot of strange marks and wanted to avoid that with the actual paint.
  10. Let doors dry for 4-5 days until they aren't tacky, then install new hinges and rehang. I type this like it's easy - rehanging was the most difficult part because I bought new hinges. Even though they were the same size the doors did not hang exactly right. My neighbor Matt saved the day and did this part for me - THANK YOU MATT!! The trick ended up being some creative screwing of the hinges on the door (the top hole needed to be at an angle) to get the hinge flush with the door edge. Then when he attached them, he only screwed them into the base about 98%. If you screwed them in all the way, it shifted the doors over an 1/8 of an inch and they wouldn't close right.
  11. While the doors are drying, measure and cut the new shelf liner and install
  12. Install new pulls
  13. Wipe down cabinets and touch up any paint nicks

Originally I was going to tell you all exactly how long this project took, but that was when I was under the impression I could get this done in 6 days over two weekends. WRONG. It took me a month. I stopped keeping track at 16 hours, but will put this at about 30 hours of work and lots of trips to Home Depot. Anybody else notice you can never just go once a day? I always end up there twice. Always.

Kitchen Cabinets: Before & After
Ok, now for the goods! Here is how my kitchen used to look


And here are my newly painted cabinets. The white cabinets actually make the peach tile look kind of cute. I certainly don't hate it as much now. And the green lower cabinets with the hardware make the peach feel a little art-deco. I decided to do the lower cabinets a color other than white because the floor tile is white and I just felt it would look to sterile and institutional if all the cabinets were white as well.

The upper cabinets are one of Behr's whites, I forget which, but it's in their Light and Whites booklet. The lower green cabinets took longer to settle on. After 6 samples of various shades of light green, I settled on Martha Stewart Artichoke Heart, but color matched and mixed in Behr paint.


I repainted the walls with some leftover Restoration Hardware Cappuccino from my living room accent wall (also color matched and mixed in Behr). I had a  really hard time figuring out what color to paint the wall since white and green are really the only thing that go with peach. I had found a nice rose pink that would have worked but I was concerned it would make it too girly. Then I remembered I had about 10 different colors of paint in the garage from painting the rest of the house 2 years ago and this light brown worked out nicely.  

Hardware Details:
Door pulls are Stone Mill Satin Nickel 3-ring Cabinet Knobs which I purchased from Overstock.com (I had O rewards which is why I paid less than the listed price)
Drawer pulls are Stone Mill Satin Nickel Nantucket Cup which I also purchased from Overstock.com
Hinges are 3/8 offset satin nickel. I bought mine at San Diego Hardware but they have them at Home Depot as well.


Next Project 
Other than the cabinets, there are two things I've detested about my kitchen since I bought the house: the kitchen faucet and the appliances. Or rather, the dishwasher in particular b/c it's black and because it gets moldy inside. Yuck! I can't update all my appliances right now, but this week I'm going to buy a stainless dishwasher. I think it will look really nice with the new hardware and paint. And it won't be loud or stinky.

I already bought a new, tall faucet with a pull down nozzle this weekend so I hope to get that installed this coming weekend. Once these things are done, my updated kitchen will go a long way towards making my like my house again. I haven't been very happy with it for the past year, mostly because I'm embarrassed by my front yard. By then end of this year, I'm going to get it landscaped, even though I hate how much it's going to cost =( But at least I'm no longer embarrassed by my kitchen!!

Final After Pictures (December 2011)
This post gets a lot of traffic (apparently lots of you are researching before and after painted kitchen cabinets - I know I did!). Well, it bugs me that this post has the picture with my old dishwasher, so here's how the kitchen looks after I finished installing the dishwasher and new faucet):

Final After picture with painted kitchen cabinets, new dishwasher and new faucet. Ta-da!


Friday, August 12, 2011

Painting the Kitchen Cabinets Pt 2 - Cabinet Removal

Here was my game plan for the kitchen cabinet project:

Round 1 (Thur-Sat, an hour Th, a couple hours on fri, then the rest sat afternoon/evening):
  • remove doors/hardware
  • clean
  • sand (to remove the polyurethane coat)
  • prime

Round 2 (hopefully sun):
  • paint (2 coats, but I don't plan on painting the cabinet interiors)

Round 3 (the following sat&sun)
  • put down contact paper
  • install new hardware
  • rehang doors

I'm naive. I thought removing the cabinets and the hardware was going to be easy, if a bit monotonous. I actually thought I could get all 20 doors removed in an hour last night. I grossly underestimated.

Actual cabinet doors removed: 11
Actual time spent: 1.5 hours

Remaining Cabinet doors: 9
Remaining hardware removal from doors/drawers: 40 hinges (or put another way, 120 screws) and 25 handles (or 50 large bolt screws)
Time remaining: I bet it's more than an hour

Stupid screws. And I only would have been able to remove the lower ones had Adam not given me his ladder when he moved to Australia. Thanks Adam! I tried doing the upper cabinets with just my little IKEA step stool, but reaching above my head to remove super tight, semi-stripped screws was not working. Thankfully the ladder gave me the leverage I needed, but my arms and hands just couldn't take doing all 20. Not to mention, every time I was on it, just on the second step with one foot on my counter, my brain was half occupied with thoughts of the ladder collapsing and me breaking various bones. I have decent balance and am probably less clumsy than your average person thanks to volleyball and surfing, but I swear, you raise me 20 inches off the ground and all of a sudden I get locked knees and my legs are shaky from the effort of trying to hold myself still.

So instead of taking one night to get the cabinets down, it will take two. I'm doing it manually with a screwdriver because it didn't look like a drill could reach the screws on the hinges (TIP: I switched to a short neck screwdriver, it's about 3.5 inches long, and it makes getting the tough ones out much easier!). Plus me operating a drill is about as successful as a dog opening a jar. I just can't do it. Which friend am I going to pay low wages to help me rehang them because that will require drilling? =)

I got half the cabinets down!

Needless to say my planned schedule is already shot since I overlooked little details like: how much a screwdriver hurts my hands after an hour, the fact that I have to fill and sand all the holes left by the screws, and how long it'll take to hand sand the archs and edges on the doors (at least I have Adam's hand sander for the flat stuff). I'll be lucky if I can even get to priming this weekend thanks to the hardware!

In the meantime, my cat Jackson is enjoying the open access to the lower cabinets which he likes climbing in the back of (he does it when the doors are on too, using his little nose to work the doors open. Yes, that means there is cat hair on my baking pans. And yes I rinse them before I use them. Most of the time...)

And for anyone concerned, don't worry, I numbered my doors and made a map so I piece this puzzle back together correctly!

Thursday, August 11, 2011

Painting the Kitchen Cabinets

I'm about a year and a half behind on blogging, but I'm going to catch up! I promise to fill you in on all the fun updates and purchases in a series of posts in the coming weeks, but for now, let's focus on the current project: updating the kitchen cabinets.

I would love brand new cabinets, but I'm not willing to invest $5k in new cabinets for this house, so a paint and hardware face lift it is! If HGTV, Trading Spaces, and Color Splash all say it's good for my kitchen, it must be true.

I've owned my home for just over two years now. And since day one I've been talking about painting the kitchen cabinets. I even bought the paint. A year ago.

First let me tell you how much I hate my cabinets. The only thing they have going for them are that they're real wood. But they're straight out of the 80s country kitchen scene. They have tacky gold handles, the hinges are some other color that doesn't match, and they're this ugly arched grooved style. I don't know the name, so let's just call it Country Eye Sore. I would love love love to have some square, simple cabinets. Instead, I have these:


I had a false start on motivation about 2 months ago when I took the doors and hardware off the single cabinet in the breakfast nook - it was to be my test run. I got as far as cleaning the doors, then they sat on the nook bench, enjoying the view for the summer.

This week I finally got serious. I did some internet research and looked at what other people had done.

Why research, when I had already bought the paint a year ago? Well, I bought white paint. I still want white cabinets. But my entire kitchen and nook have white tile on the floor. Tile that would take me days to tear out and replace (I removed about 13 squares of it in the entryway when I first moved in and it took 4 hours of backbreaking work. There are over 100 squares in the kitchen).

Current state of my kitchen, August 10, 2011. Envy my white tile floor an peach tile counters/backsplash.

Now I know all white rooms are all the rage for rockstars, Bravo Real Housewives, and people who live in Miami, but I don't think that applies to kitchens in Rolando. So I decided I would paint the lower cabinets a different color but paint the upper ones white as originally planned. After my research, I decided some light gray, green, or taupe color would contrast nicely. Kind of like this:


After reading a helpful how-to blog post on Young House Love, I headed off to Home Depot to purchase a few things:
  • Oil-based primer
  • Wood filler
  • Good rollers
  • Paint brush
  • Lots of sandpaper
  • Cleaning gloves
  • Painter's tape
  • 8 gazillion paint swatches
Grand total: $79 (but only $29 b/c I used my birthday gift card from Stephen - thanks, man!)

Still to purchase:
  • Lower cabinet paint
  • New hardware (I just heard my wallet gasp...)
  • Contact paper for the shelves

Tonight I begin disassembling the kitchen and cleaning years of gunk off the doors.

Read Painting the Kitchen Cabinets Pt. 2: Cabinet Removal
Read Painting the Kitchen Cabinets Pt. 3: Before & After