Monday, September 12, 2011

House Facelift: New Exterior Paint, deck and walkway

This is one of my catch-up posts. Like big-time catch up since this happened in November 2010! For anybody reading this on Facebook, you may have already seen the photos in one of my albums. But this is where you get to read how crazy I am.

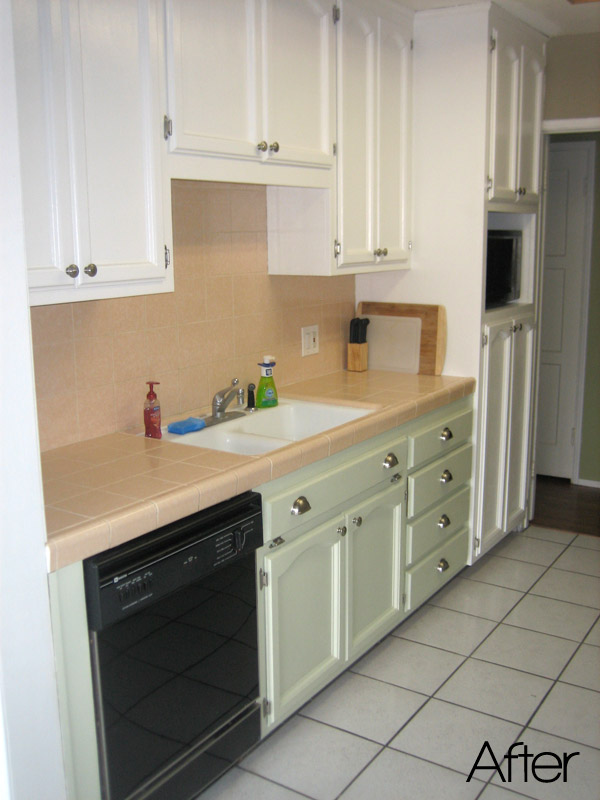
My house was a fleshy-peach color when I bought it. And now that I think of it, so are the counters in the kitchen - what was the previous owner's obsession with flesh-tones?!? Along with the flesh exterior, it had an accent color on the shutters and trim that was somewhere between lavender and gray. In other words, my house was ugly.
Such a sad looking house.

I've always wanted a yellow house. But during a year of rubbernecking at peoples' paint jobs as I drove through neighborhoods (I'm still surprised I never hit a parked car...), I wasn't so sure yellow or any light color paint would look good on stucco. The very front of the house is wood where an addition was put on the living room, but the rest of the house and the garage are stucco. And light colored stucco just looks dirty and cheap to me.

But I REALLY wanted a yellow house. So one weekend I found two houses in my neighborhood that were yellows I liked. I went to Home Depot and grabbed a bunch of yellow swatches. Then drove back to these houses, ran up to the corner of each and shuffled though all my swatches trying to find a match, all the while waiting for the owners to come out and ask what the hell I was doing. Luckily no one busted me, although I did get strange looks from some dog walkers. And I wasn't that quick about this - first I would check the swatch on a corner where the light was hitting, then I'd go to a corner in the shade. I'm serious about my color matching!

I then went back to Home Depot, because as I've said before, I can never go just once in a day, and got about 8 samples of yellow paint, plus two dark brown and gray colors. At this point I had already hired a painter even though I didn't have the colors picked yet. I needed the deadline pressure because I knew it would only take him about 3 days to prep the house.

He painted the samples up on the side of the garage while I was at work and when I got home, I was not too surprised to see that ALL the yellows looked terrible. I wish I had taken a picture! I distinctly remember one looking like lemon pie filling and another looking like egg yoke. I didn't like the darks either, but they looked better on the stucco.

Now I knew I had to go dark and luckily there are two houses that I pass by every time I go pick up my neighbor Matt to go surf that had similar dark color schemes that I really liked. So I once again did my creepy-neighbor paint matching technique with some swatches to determine what color their houses were, then told my painter Joe to go for it.

Here is the final result (please ignore my giant slip and slide in the front yard; I was trying to kill all the bermuda grass in preparation for landscaping which I still haven't done).

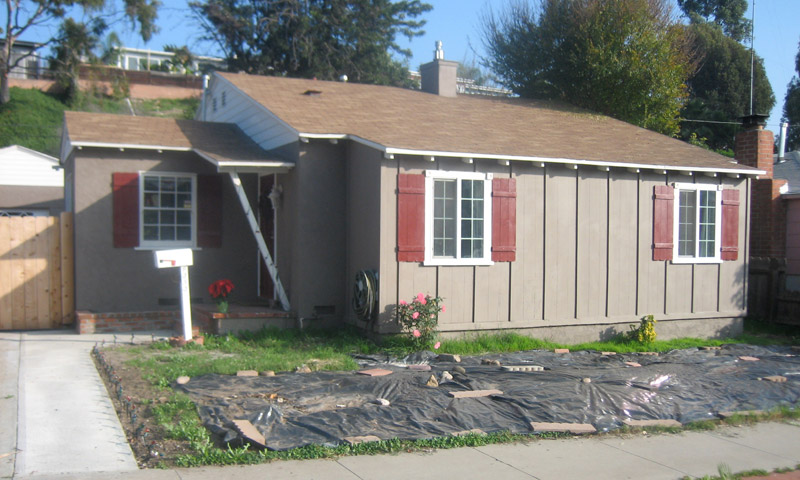
I went with a brown, red and white scheme. I love my red shutters! And the brown is a nice chocolate mousse brown that's not too dark or too light.

You might also notice that the broken cement and brick walkway next to the driveway was replaced with a cement walkway that my friend Max did for me. I also had him remove the big bush by the front door and build a brick planter. Eventually I'll put some plants in it!

I also had Max do some work on the back deck. I'd always wanted to tear off the front rails and extend the steps to open up the deck. I think it's a nice improvement. Here is the before and after of the back of the house (which also shows off the paint job nicely):


As always, for those interested in cost associated with home improvement, painting the exterior of my 1300 square foot home plus the detached garage and deck was about $3600 for labor and paint.

Monday, September 5, 2011

Painting Kitchen Cabinets Pt. 3: Before & After

First the answer to what everyone wants to know: how much did it cost and what do I need??

Supplies and Cost
I had 23 cabinet doors and 7 drawers and two very small portions of wall to repaint.

  • Paint (2 gallons semi-gloss, plus samples) - $70
  • Primer (1 gallon, oil-based) - $22
  • Brushes (Purdy) and Rollers (smooth surface) - $28
  • Wood filler, small tube - $4
  • Painter's tape - $4
  • Medium Grain Sandpaper - free, already had
  • TSP cleaner - free, already had
  • Cabinet pulls (35) - $90
  • Screws (the ones that came with the pulls were too short) - $7
  • Hinges (23 pairs) - $78
  • Shelf liner (3 rolls) - $22
  • Brush cleaner - $8
  • Cleaning cloths - free, already had
  • Tools needed: screwdrivers, drill, orbital sander, hand sander, putty knife
Total cost: ~$335

How to Paint Cabinets
As I mentioned in my first post about this project, I read this blog to figure out what I needed to do. Now let me tell you what steps were involved
  1. Remove all doors and hardware
  2. Remove old contact paper and wipe down shelves/drawers
  3. Clean cabinet doors with TSP
  4. Fill old handle holes with wood filler (only necessary if your new pulls are a different size)
  5. Sand cabinets with medium grit paper to remove finish and smooth wood filler
  6. Wipe sanded cabinets twice - once with dry cloth, once with wet cloth
  7. Prime everything (I used oil based primer and a roller)
  8. Lightly resand to fix any rough spots or strange roller patterns left by the primer
  9. Paint cabinets - I did the backs with a high quality roller and did the fronts, which have a lot of details, with a large paint brush. I did this b/c when I primed, I saw the roller left a lot of strange marks and wanted to avoid that with the actual paint.
  10. Let doors dry for 4-5 days until they aren't tacky, then install new hinges and rehang. I type this like it's easy - rehanging was the most difficult part because I bought new hinges. Even though they were the same size the doors did not hang exactly right. My neighbor Matt saved the day and did this part for me - THANK YOU MATT!! The trick ended up being some creative screwing of the hinges on the door (the top hole needed to be at an angle) to get the hinge flush with the door edge. Then when he attached them, he only screwed them into the base about 98%. If you screwed them in all the way, it shifted the doors over an 1/8 of an inch and they wouldn't close right.
  11. While the doors are drying, measure and cut the new shelf liner and install
  12. Install new pulls
  13. Wipe down cabinets and touch up any paint nicks

Originally I was going to tell you all exactly how long this project took, but that was when I was under the impression I could get this done in 6 days over two weekends. WRONG. It took me a month. I stopped keeping track at 16 hours, but will put this at about 30 hours of work and lots of trips to Home Depot. Anybody else notice you can never just go once a day? I always end up there twice. Always.

Kitchen Cabinets: Before & After
Ok, now for the goods! Here is how my kitchen used to look


And here are my newly painted cabinets. The white cabinets actually make the peach tile look kind of cute. I certainly don't hate it as much now. And the green lower cabinets with the hardware make the peach feel a little art-deco. I decided to do the lower cabinets a color other than white because the floor tile is white and I just felt it would look to sterile and institutional if all the cabinets were white as well.

The upper cabinets are one of Behr's whites, I forget which, but it's in their Light and Whites booklet. The lower green cabinets took longer to settle on. After 6 samples of various shades of light green, I settled on Martha Stewart Artichoke Heart, but color matched and mixed in Behr paint.


I repainted the walls with some leftover Restoration Hardware Cappuccino from my living room accent wall (also color matched and mixed in Behr). I had a  really hard time figuring out what color to paint the wall since white and green are really the only thing that go with peach. I had found a nice rose pink that would have worked but I was concerned it would make it too girly. Then I remembered I had about 10 different colors of paint in the garage from painting the rest of the house 2 years ago and this light brown worked out nicely.  

Hardware Details:
Door pulls are Stone Mill Satin Nickel 3-ring Cabinet Knobs which I purchased from Overstock.com (I had O rewards which is why I paid less than the listed price)
Drawer pulls are Stone Mill Satin Nickel Nantucket Cup which I also purchased from Overstock.com
Hinges are 3/8 offset satin nickel. I bought mine at San Diego Hardware but they have them at Home Depot as well.


Next Project 
Other than the cabinets, there are two things I've detested about my kitchen since I bought the house: the kitchen faucet and the appliances. Or rather, the dishwasher in particular b/c it's black and because it gets moldy inside. Yuck! I can't update all my appliances right now, but this week I'm going to buy a stainless dishwasher. I think it will look really nice with the new hardware and paint. And it won't be loud or stinky.

I already bought a new, tall faucet with a pull down nozzle this weekend so I hope to get that installed this coming weekend. Once these things are done, my updated kitchen will go a long way towards making my like my house again. I haven't been very happy with it for the past year, mostly because I'm embarrassed by my front yard. By then end of this year, I'm going to get it landscaped, even though I hate how much it's going to cost =( But at least I'm no longer embarrassed by my kitchen!!

Final After Pictures (December 2011)
This post gets a lot of traffic (apparently lots of you are researching before and after painted kitchen cabinets - I know I did!). Well, it bugs me that this post has the picture with my old dishwasher, so here's how the kitchen looks after I finished installing the dishwasher and new faucet):

Final After picture with painted kitchen cabinets, new dishwasher and new faucet. Ta-da!