Showing posts with label Before and After. Show all posts

Saturday, July 28, 2012

Evolution of a Back Porch

Looking through my iPhoto albums, I was amused by my early attempts to make my back patio appealing. And by what shithole my house was when I bought it - good thing I saw the diamond (ok, cubic zirconia) in the rough!
Day of walk through in June 2009. I think the stump in the yard was what sold me.
Rake the dirt yard, add some kitchen chairs and a few spikey, colorful flowers and presto-chango!
Still a shithole.

Do the cute flowers distract you from the peeling paint??
Porch 2.0 - removed the front railing and repainted. So happy. November 2010.

Final product, July 2012. New inviting chairs & pillows, more plants and a lawn!!
Now I actually sit out here.

Return of the spikey flowers. I love these things.
Close up of the succulent planter I put together that's on the front of the porch. Plus a peak at what the dirt yard was transformed into.

Wednesday, January 11, 2012

Backyard Makeover

After finally coming to terms with the fact that DIY Network's "Yardcrashers" was never going to accost me in my local home improvement store and offer to do my yard for free (mostly because I don't live within 25 miles of Los Angeles or wherever they film), I plunked down some dough to have my backyard landscaped.


Before and After
I'll start with the money shot, but there are way more before and afters at the end, including the true before and afters from when I first bought my house. I'll do an update in 6 months after the plants have matured, spread out, and are hopefully all in bloom!

Also, I have to say, it was glorious to take off my shoes and step on my new lawn the day it was installed. It is SO SOFT. I know that will go away after it's been mowed a few times, but man I love my fresh grass right now!

Backyard the day before landscaping began.


Backyard after (January 6, 2012). And yes, this means I sold the
trampoline (to two very stoked 20-something boys from Pacific Beach).
Please note that the brick walkway on the right is now even!!

If you're a regular reader, you know I had my front yard done just a couple weeks ago; you can read about that here. Then the first Monday after Christmas, my landscaper Jeff Raymond moved on to the backyard because I decided to spoil my house for Christmas this year. The backyard was a little more work since lots of demo and ground leveling had to be done, plus irrigation needed to installed but it still only took about 5 days total.


The Plan
I had a maximum budget of $4000 for the backyard, so we kept it simple (and thanks to my friend discount from Jeff, I got more done than I could have with anyone else as there was a decent amount of labor and parts required for the irrigation sysem).

How my yard used to look in the summer.
Right side of yard where pavers and flagstone was
(the flagstone is left of the pavers, but covered
in dirt in this picture).
My friend Krista Percival (kplandscapedesign.com) had created an amazing, surf-inspired design for my backyard but unfortunatley I couldn't afford it (it probably would have cost twice the entire budget I had for the front AND backyards). I hope to one day, in a future home, have a surf-inspired backyard, but for this house, which I don't expect I'll be in for more than a few more years, it didn't seem wise to spend a lot of money on a very personal backyard design. Instead I've decided on something more generic that will appeal to a broad range of future buyers (and won't be a total waste of money if they tear it all out when they move in). 

The plan was to remove the weird, poorly laid flagstone patio and uneven brick walkway on the right side of the yard (see picture above) then to create a grass area in the middle with a garden area that curved along the back and down the right side.


The Plants
Jeff used all the same plants as he used in my front yard (view list in this post) to carry the design through to the back of the house. The only additional plants were:
  • lemon tree
  • purple hopseed bush
  • euryops ("daisy bush" - these were chosen because they grow fast and will do a good job masking the fence once they fill in)
Jeff also reused all the granite rocks that a previous owner had used when they first did the yard. He used those to make my new garden area perimeter and also put some of the larger ones in random spots in the garden bed which I really like. Although I still have a ton (probably literally) of these rocks left:

All the leftover granite...call me if you have a project!
You may remember I used this spot to store another pile of rocks.


More Before and After

Here is more backyard before and after porn for you.

My backyard before, in the summer of 2009. This is when it was in decent condition b/c at least the weeds were dead and not knee high.
This was what I used to call "excellent" condition for my backyard. Twice a year I'd clear all the weeds, rake the ground, and have a lovely, neat dirt plot to admire. It never looked better than this.
My yard today, January 2012. Same pic from beginning of this post. I love my cute little yard!
Back corner before

Back corner after. Sadly, the tree in the corner died a year after I moved in, but I keep it b/c it provides a nice screen from the neighbors on the hill.

 My lemon tree and an example of some of the reused granite inside the garden beds.
Back wall before, again, summertime dry and dead look and in need of a raking.
Back wall after. check out the well groomed tree - I did that part myself about a month
before landscaping started! Ok, I admit it. I gave the tree a bowl haircut.
Looking from back corner into the yard before....
....and same view after! Don't you want to come over and have a lemonade with me now? This is my favorite after picture.

Side of garage the day I bought the house, June 2009. I hate roses.
Side of garage, January 2012. No more roses (kangaroo paws instead) and no more
single, stupid shutter on the window.
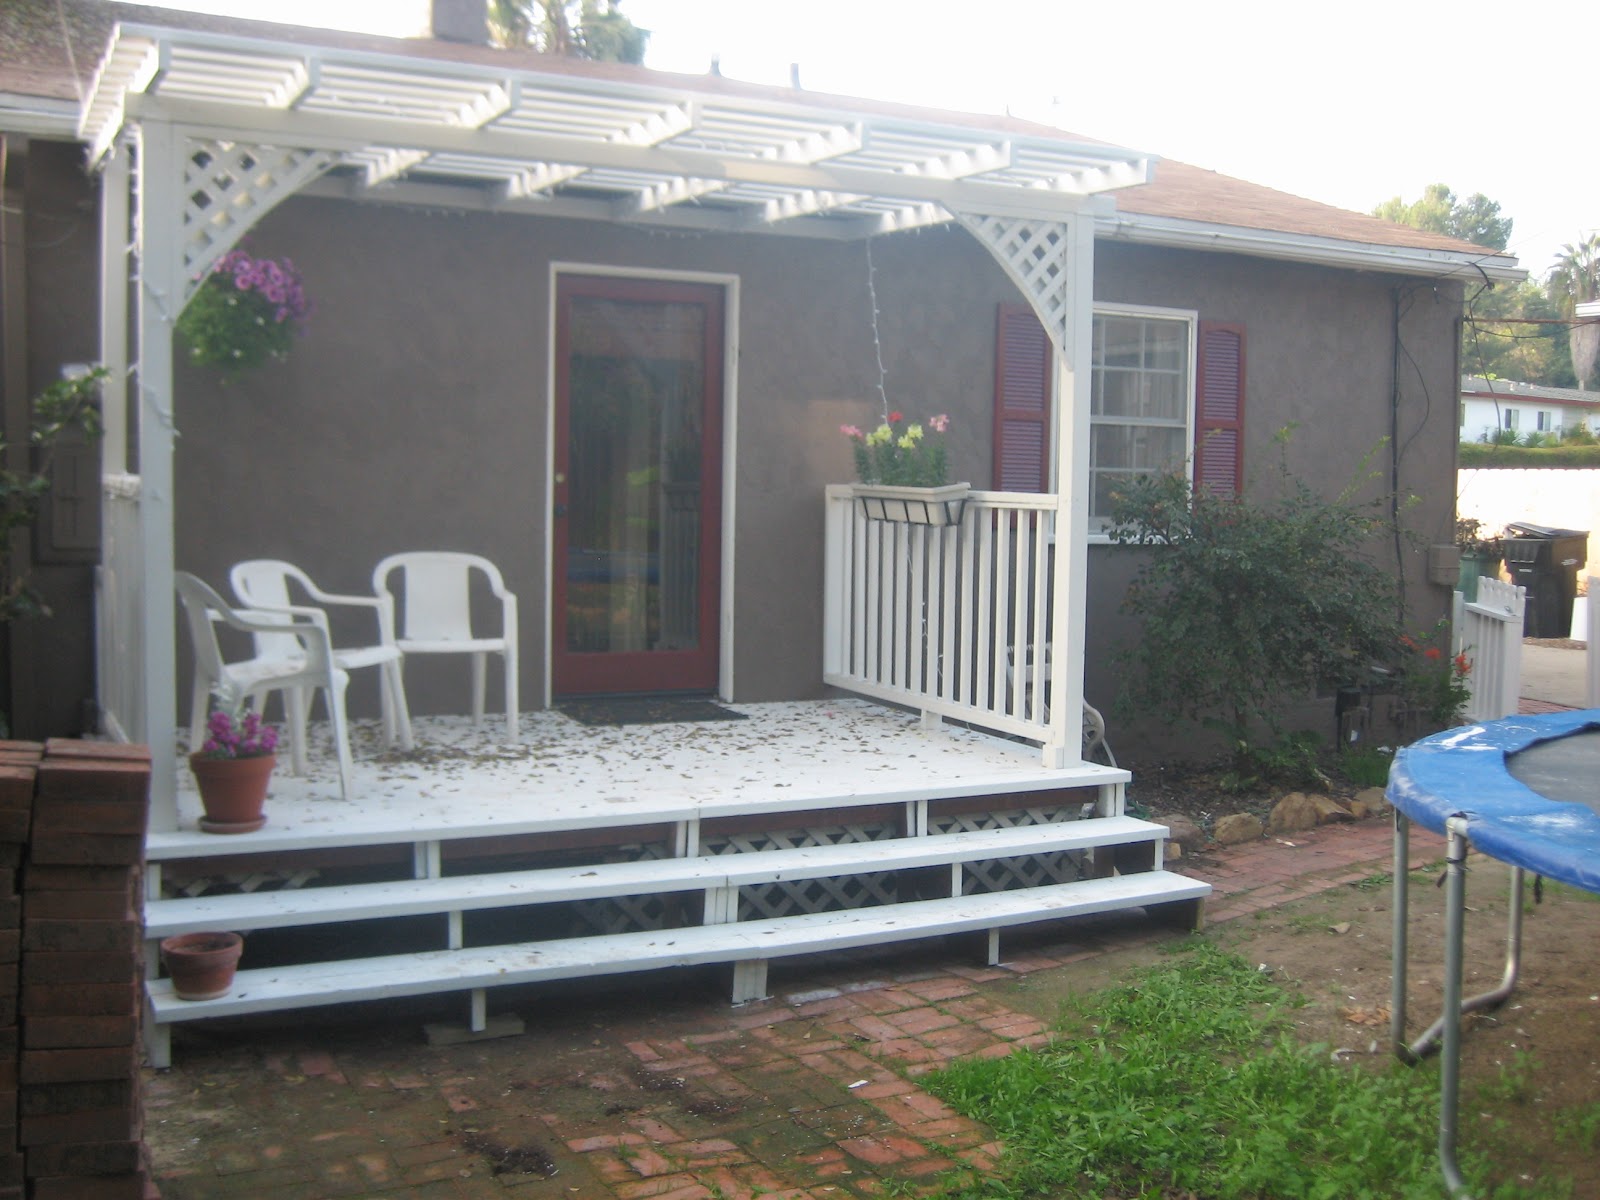
Back patio view the day I bought the house, June 2009.


 Wrong angle, but back patio after. In December 2010 I had the front rails removed
and the stairs expanded all the way across. I just need to put a some potted plants out.


Same pic from earlier in the post, but compare to the below. This was in 2010 - check out the growth on the palm! and we removed the weird stone table coming out of the fence.

 
View down the right side of the yard. 
Read about my front yard makeover which I did a month before this project.

Sunday, December 18, 2011

Curb Appeal - My New Front Yard

After two long years of being extremely embarrassed by my front yard, I finally got my act together and for Christmas, I got a new front yard. Best gift ever!

Before & After
Click on any picture to see a larger version. At the end of this post are the super before pictures from the day I bought the house.
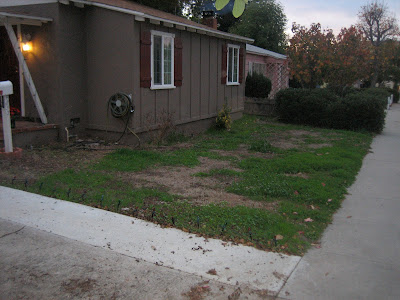
My yard before, complete with dead rose bush (I purposefully killed it).

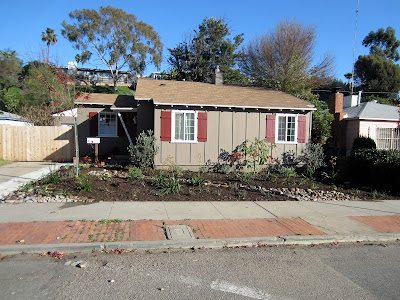
My yard after. The sun is kind of blowing out the detail, thus the additional picture below.
 
My yard after, taken in the morning with less sun so you can see better. All the green, leafy plants in the lower corner are Day Lilies and will bloom with yellow flowers.

I'll post a picture of my yard again in the spring/summer after the plants have matured and/or bloomed. Some of them are dormant right now, and to stay within my budget, it was cheaper to get less mature plants that would grow into the yard.

History of the Project
I've had a beautiful plan for my front yard, including an awesome deck proposal, thanks to my friend Krista Percival (kplandscapedesign.com) that she designed for me right after I bought the house, but the few times I got quotes on implementing the plan, it was way outside my budget which was disheartening and why I never got anything done. If I intended to live here for 10 years, it would be easier to spend a lot of money on my dream cottage yard, but I don't think I'll be here more than 5 years (something I didn't tell Krista), and 2.5 years have already passed. So I needed to get something that looked nicer than dirt and weeds and incorporated the types of plants I like, but wouldn't cost more than $3000. When I graduate from my starter house to my for realsy house later on in life, I will definitely get a full-blown Krista Percival design though!

Luckily I found out that a friend of mine, Jeff Raymond, who recently moved to town, does landscaping and he gave me a very fair deal.

Aa web designer myself, I hate to say my yard is a modified version of the original design Krista created, because really it's quite different and I know Krista would agree this isn't her design - so lets call it inspired by the original plan instead. We used the same plant types and some of the layout/placement, but this is truly the budget version of what Krista originally envisioned. Plus the addition of a dry riverbed, a feature I'd become fond of in the past 12 months or so and thought would work well in my yard.

Another angle. The rocks in the front corner are
b/c the street floods that corner of my yard
every time it rains. The tree is a young
crepe myrtle.
Time Frame
In one weekend Jeff got 90% of the job done, and would have gotten it all done except the rock yard for my dry riverbed was closed on Sunday (even though their website said they weren't).
The Plants
One way we kept cost down is to reduce the number of plants, and even still, it was almost $1000 for plants. Another way to keep cost down, as mentioned, is to buy younger plants rather than fully mature ones. So it will take a while for them to really grow in, but that's okay.

There are two trees, an angel's trumpet, which is the yellow one by the window (we wanted to get the next size up, which would have been in a box, but all the super mature ones were gone everywhere because they're blooming now and in high demand. But that saved me about $100).

The second tree is a crepe myrtle, near the front corner by the driveway, which will bloom a dark pink.
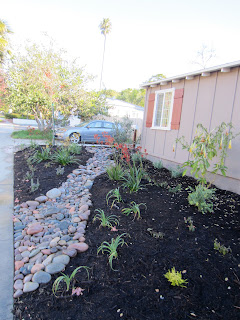
The angel's trumpet got a little frost bitten
but it will recover. Believe it or not, it's
cold in San Diego in December!

I think there are about 50 plants in the yard. All the plants are the ones Krista originally had in my plan; she spent a lot of time with me learning what I liked and figuring out the best plants that would require the least water. Some of the plants the nursery delivered, especially the ones in 5 gallon pots, were a little on the tiny side. But they'll mature and grow in over the year.

I linked the plant names to Google Image searches so you can see what things will look like when they bloom/are mature.

  • Hemerocalis Hybrid - "Yellow Day Lilies" - they'll be yellow when they bloom, they're the green leafy things along the front and by the mailbox
  • Kangaroo's Paws - love these; they're the tall, slender yellow and orange plants)
  • Lantana - the red and yellow,  and purple varieties; they don't look like much now, but that's b/c they're dormant
  • Salvia Leucantha - "Mexican Sage Bush" - another fave of mine; along the wall under the window; these will grow into bigger bushes
  • Rosmarinus Officianalis - "Rosemary" - smaller purple clusters strewn about the yard
  • Feijoa Sellowiana - "Pineapple Guava shrub" - these are the bushes on either side of the house
  • Coleonema Pulchellum 'Sunset Gold' - the small yellow, spiky ones stewn on either side of the yard
  • Polygala - "Petite Butterfly Sweet Pea" - the two shrubs on either side, near the middle. These will have tiny purple flowers.
  • Aeonium Schwarzkopf - succulents - my original plan (which called for aeonium urbicum - "dinner plate"), these are the 3 at the front, and 4 next to the driveway.

I also had Jeff trim my palm tree since the city doesn't maintain street-side trees anymore. It was a huge job, but I'm so glad it's done! The sidewalk looks more open. And it's perfect that the day was dreary for my before and brilliant for the after picture.

Palm Tree before
Palm Tree after

For irrigation, Jeff installed a drip system. There are drips on every plant; the small ones get one drip, the larger get two. Each drip puts out 1 gallon of water per hour but I only need to run the drip system for 25 minutes.

The Neighbors
I was telling Jeff about how the couple who owns the rental across the street always manage  to drive by the day I've done some new work (they don't live in the neighborhood) and they're always really excited about what I've done (remove the trees, put in a brick planter and walkway, painted the house), but the next question out of their mouths is always "are you painting the house next?" or after I painted the house "are you doing your landscaping next?". And funny enough, not 10 minutes after I told Jeff about them, they showed up (they must have a survalence camera pointed at my house!). I was inside, so I didn't get questioned about my next project, although they have nothing left to nitpick since everything they can see from the street is now done. They did chat with Jeff about doing some work for them though, so that's good for him.

I'm waiting for my annual Christmas card from this couple, and dammit, it better say how awesome my yard looks. (Author's note: I wrote most this post before Christmas - I did get the neighbors' card and it did in fact say "your house looks great!").


My House on Purchase Day vs. My House Today
The true before and after =)

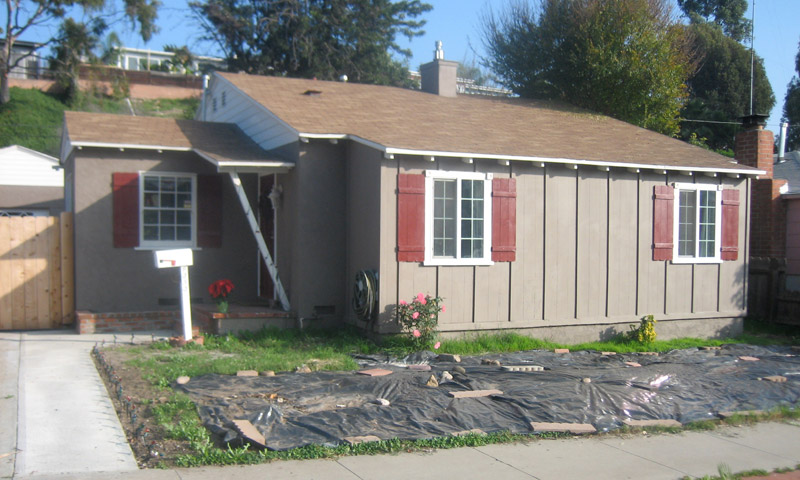
June 2009

December 2011

Next project? The backyard which is getting installed this week. I spoiled my house for Christmas this year. (Editor's Note 1/6/12: the backyard is done! Read about it in my Backyard Makeover post)

Monday, October 24, 2011

Amber vs. Dishwasher Installation

I had absolutely no idea how to install a dishwasher. But since I was replacing an existing dishwasher with a new one, I figured all the hard work has been done and I just need to pay attention to how the old one is hooked up and mimic that for the new one.

I now know how to install a dishwasher; next time I will pay to have someone do it for me.

After updating my kitchen cabinets last month, I decided a new stainless steel dishwasher would look much nicer than my existing black one. Plus it gets moldy inside. That could be because the dishwasher is old, or it could be because there's no air gap (what's an air gap?) through the sink which I found out from Home Depot is required in California. Luckily by installing my new kitchen faucet along with the dishwasher, there is now an air vent because I no longer need a hole for the pull out sprayer.

Old dishwasher and faucet

I did a lot of looking around at all the major appliance websites, Sears, Sears Outlet, Home Depot, Lowe's, and looked at the websites for several local dent & ding wholesales places. I ended up returning to Home Depot to buy the first dishwasher I saw and liked that was near my $500 budget. There are really nice ones if you can pay a few hundred dollars more, but I'm single and don't even run my dishwasher once a week, so I don't need a mega-washer. I did however want one with a stainless interior. Just as extra precaution against mold and stink on the inside.

I bought the GE Adora Dishwasher in stainless steel because I liked that it had hidden controls and a stainless interior. It was on internet special over Labor Day weekend for $538 (from $699), plus they have free delivery and haul away. The Adora series is exclusive to Home Depot and pretty new so there weren't many reviews, but my research enthusiast friend Sara checked with her Consumer Reports subscription and confirmed GEs have good reviews and I liked them better than the Maytags I looked at in the store (those tend to be the two brands that offer a lot of models in the lower-end price range).

How To Install a Dishwasher
First, let me state that the paragraphs above were written 6 weeks ago. I only now have just completed installing my dishwasher - and not because I procrastinated! I've literally had to do this in phases every 5-6 days and have probably spent about 10 hours on this project if you include all the trips to home depot. Knowing what I know now, I wish I had paid the $80-100 to have a professional do this. But there was something in me that wanted to prove I could be handy. What I'm wondering now, is just who I wanted to prove that to? My cat Jackson? There's nobody in this house who cares if I do things myself or pay someone to do it.

 My cat Jackson. Not impressed by my handiwork, but a fan of the new area rug he can lounge and scratch on.

That being said, here's how you install a dishwasher, assuming you are replacing an existing one:


Removing the Old Dishwasher
The only tool you should need is a screwdriver and possibly a wrench. You'll also need a bowl.

  1. First, pay attention to how things are hooked up (I took pictures, which is good since I worked on this for so long, I forgot how it was originally set up)
  2. Turn off the water supply to the house
  3. Unplug dishwasher from the outlet (assuming yours has a plug and is not hard wired)
  4. Place a bucket or bowl under the areas where you'll be disconnecting pipes.
  5. Disconnect the drain tube (mine was attached to the garbage disposal, but if your dishwasher is hooked up properly, yours should be attached to the air gap up by the faucet holes)
  6. Disconnect the waterline (on newer dishwashers, this will be a flexible tube; on older models, like mine, it will be a thin copper pipe). If this is connected extremely tight, you may need a wrench to loosen. A little water will come out. 
  7. Grab your screwdriver and unscrew the bracket mounts from under the countertop. These are located above the door.
  8. Pull the dishwasher out from under the cabinet. 
I think step 8 is supposed to be easy but in my case this is where one of my big hangups was. I tugged and pulled and the dishwasher wouldn't come out. I thought maybe it was stuck b/c it was lower than the tile on the kitchen floor. Then after letting it sit for a few days, I realized I might be able to tilt it back a little bit so I could lift the front legs over the tile lip. Well, I could tilt it, then I was able to adjust the height of the front legs and was able to pull the dishwasher out. I did a jig, then used my He-Man muscles to carry the dishwasher outside.


Installing the New Dishwasher
So the manual with your dishwasher will explain how to do all this. It will arrive screwed on a pallet to keep it stable which you'll need to remove before installing.

  1. Test the door and adjust the springs if it is too stiff or loose
  2. Remove the dishwasher from the pallette (you'll need a wrench)
  3. Attach the water line and drain hose
  4. Attach the electrical cord. I had to buy the GE standard electrical kit (about $5) and connect the electrical wires to a cord with a 3 prong outlet. Apparently dishwashers can be hardwired into the wall.
  5. Adjust the dishwasher legs if necessary so you can slide the dishwasher into the cabinets
  6. Your dishwasher cabinet should have two holes into the sink area - one for the water line and drain hose and a second to run the power cord through. Thread everything through the appropriate holes and slide the dishwasher in (haha...I wish it had been that easy for me! Much fiddling and fighting with the leg heights
  7. Once in, use a level to make sure it's level from front to back and side to side
  8. Now connect your water line to the hot water pipe under your sink
  9. The drain hose should connect to your air gap (many YouTube videos on this) and then you need to connect the airgap to your garbage disposal with a heavy duty black rubber pipe (I don't know what it's called, but if you don't already have it from your old dishwasher, they'll point you in the right direction at the hardware store. It was about $4). You'll probably have to cut the pipe down (another hangup for me).
  10. Now you're done. Turn the water supply back on, filler 'er up and cross your fingers that nothing leaks when you press start!
Reading this, you'll see the steps are relatively simple. I just kept running into small issues along the way and getting fed up and taking 4 day breaks. BUT, I now have a new dishwasher that is so much quieter than my old one that was at least 10 years old. I can listen to the tv without having to crank the volume and close the door to the kitchen (In two years, I only washed dishes while I as at home twice because it was so loud; typically I ran it when I left for work).

Final Before & After
This is my kitchen the day I moved in:

And here is my kitchen today:
I'm still impressed that just changing the cabinet color suddenly made the peach counter and backsplash cute. Or maybe my mind is just playing a trick on me so I don't try and update that too.

Monday, September 12, 2011

House Facelift: New Exterior Paint, deck and walkway

This is one of my catch-up posts. Like big-time catch up since this happened in November 2010! For anybody reading this on Facebook, you may have already seen the photos in one of my albums. But this is where you get to read how crazy I am.

My house was a fleshy-peach color when I bought it. And now that I think of it, so are the counters in the kitchen - what was the previous owner's obsession with flesh-tones?!? Along with the flesh exterior, it had an accent color on the shutters and trim that was somewhere between lavender and gray. In other words, my house was ugly.
Such a sad looking house.

I've always wanted a yellow house. But during a year of rubbernecking at peoples' paint jobs as I drove through neighborhoods (I'm still surprised I never hit a parked car...), I wasn't so sure yellow or any light color paint would look good on stucco. The very front of the house is wood where an addition was put on the living room, but the rest of the house and the garage are stucco. And light colored stucco just looks dirty and cheap to me.

But I REALLY wanted a yellow house. So one weekend I found two houses in my neighborhood that were yellows I liked. I went to Home Depot and grabbed a bunch of yellow swatches. Then drove back to these houses, ran up to the corner of each and shuffled though all my swatches trying to find a match, all the while waiting for the owners to come out and ask what the hell I was doing. Luckily no one busted me, although I did get strange looks from some dog walkers. And I wasn't that quick about this - first I would check the swatch on a corner where the light was hitting, then I'd go to a corner in the shade. I'm serious about my color matching!

I then went back to Home Depot, because as I've said before, I can never go just once in a day, and got about 8 samples of yellow paint, plus two dark brown and gray colors. At this point I had already hired a painter even though I didn't have the colors picked yet. I needed the deadline pressure because I knew it would only take him about 3 days to prep the house.

He painted the samples up on the side of the garage while I was at work and when I got home, I was not too surprised to see that ALL the yellows looked terrible. I wish I had taken a picture! I distinctly remember one looking like lemon pie filling and another looking like egg yoke. I didn't like the darks either, but they looked better on the stucco.

Now I knew I had to go dark and luckily there are two houses that I pass by every time I go pick up my neighbor Matt to go surf that had similar dark color schemes that I really liked. So I once again did my creepy-neighbor paint matching technique with some swatches to determine what color their houses were, then told my painter Joe to go for it.

Here is the final result (please ignore my giant slip and slide in the front yard; I was trying to kill all the bermuda grass in preparation for landscaping which I still haven't done).

I went with a brown, red and white scheme. I love my red shutters! And the brown is a nice chocolate mousse brown that's not too dark or too light.

You might also notice that the broken cement and brick walkway next to the driveway was replaced with a cement walkway that my friend Max did for me. I also had him remove the big bush by the front door and build a brick planter. Eventually I'll put some plants in it!

I also had Max do some work on the back deck. I'd always wanted to tear off the front rails and extend the steps to open up the deck. I think it's a nice improvement. Here is the before and after of the back of the house (which also shows off the paint job nicely):


As always, for those interested in cost associated with home improvement, painting the exterior of my 1300 square foot home plus the detached garage and deck was about $3600 for labor and paint.

Monday, September 5, 2011

Painting Kitchen Cabinets Pt. 3: Before & After

First the answer to what everyone wants to know: how much did it cost and what do I need??

Supplies and Cost
I had 23 cabinet doors and 7 drawers and two very small portions of wall to repaint.

  • Paint (2 gallons semi-gloss, plus samples) - $70
  • Primer (1 gallon, oil-based) - $22
  • Brushes (Purdy) and Rollers (smooth surface) - $28
  • Wood filler, small tube - $4
  • Painter's tape - $4
  • Medium Grain Sandpaper - free, already had
  • TSP cleaner - free, already had
  • Cabinet pulls (35) - $90
  • Screws (the ones that came with the pulls were too short) - $7
  • Hinges (23 pairs) - $78
  • Shelf liner (3 rolls) - $22
  • Brush cleaner - $8
  • Cleaning cloths - free, already had
  • Tools needed: screwdrivers, drill, orbital sander, hand sander, putty knife
Total cost: ~$335

How to Paint Cabinets
As I mentioned in my first post about this project, I read this blog to figure out what I needed to do. Now let me tell you what steps were involved
  1. Remove all doors and hardware
  2. Remove old contact paper and wipe down shelves/drawers
  3. Clean cabinet doors with TSP
  4. Fill old handle holes with wood filler (only necessary if your new pulls are a different size)
  5. Sand cabinets with medium grit paper to remove finish and smooth wood filler
  6. Wipe sanded cabinets twice - once with dry cloth, once with wet cloth
  7. Prime everything (I used oil based primer and a roller)
  8. Lightly resand to fix any rough spots or strange roller patterns left by the primer
  9. Paint cabinets - I did the backs with a high quality roller and did the fronts, which have a lot of details, with a large paint brush. I did this b/c when I primed, I saw the roller left a lot of strange marks and wanted to avoid that with the actual paint.
  10. Let doors dry for 4-5 days until they aren't tacky, then install new hinges and rehang. I type this like it's easy - rehanging was the most difficult part because I bought new hinges. Even though they were the same size the doors did not hang exactly right. My neighbor Matt saved the day and did this part for me - THANK YOU MATT!! The trick ended up being some creative screwing of the hinges on the door (the top hole needed to be at an angle) to get the hinge flush with the door edge. Then when he attached them, he only screwed them into the base about 98%. If you screwed them in all the way, it shifted the doors over an 1/8 of an inch and they wouldn't close right.
  11. While the doors are drying, measure and cut the new shelf liner and install
  12. Install new pulls
  13. Wipe down cabinets and touch up any paint nicks

Originally I was going to tell you all exactly how long this project took, but that was when I was under the impression I could get this done in 6 days over two weekends. WRONG. It took me a month. I stopped keeping track at 16 hours, but will put this at about 30 hours of work and lots of trips to Home Depot. Anybody else notice you can never just go once a day? I always end up there twice. Always.

Kitchen Cabinets: Before & After
Ok, now for the goods! Here is how my kitchen used to look


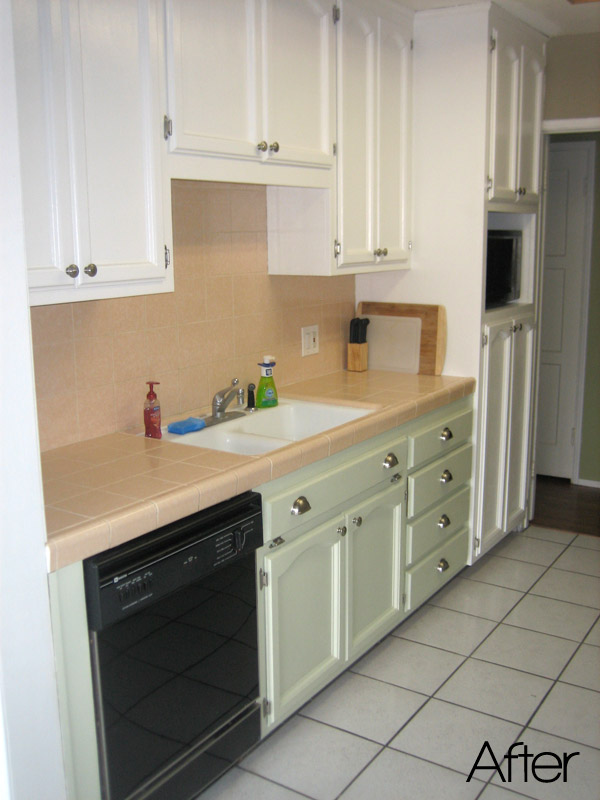
And here are my newly painted cabinets. The white cabinets actually make the peach tile look kind of cute. I certainly don't hate it as much now. And the green lower cabinets with the hardware make the peach feel a little art-deco. I decided to do the lower cabinets a color other than white because the floor tile is white and I just felt it would look to sterile and institutional if all the cabinets were white as well.

The upper cabinets are one of Behr's whites, I forget which, but it's in their Light and Whites booklet. The lower green cabinets took longer to settle on. After 6 samples of various shades of light green, I settled on Martha Stewart Artichoke Heart, but color matched and mixed in Behr paint.


I repainted the walls with some leftover Restoration Hardware Cappuccino from my living room accent wall (also color matched and mixed in Behr). I had a  really hard time figuring out what color to paint the wall since white and green are really the only thing that go with peach. I had found a nice rose pink that would have worked but I was concerned it would make it too girly. Then I remembered I had about 10 different colors of paint in the garage from painting the rest of the house 2 years ago and this light brown worked out nicely.  

Hardware Details:
Door pulls are Stone Mill Satin Nickel 3-ring Cabinet Knobs which I purchased from Overstock.com (I had O rewards which is why I paid less than the listed price)
Drawer pulls are Stone Mill Satin Nickel Nantucket Cup which I also purchased from Overstock.com
Hinges are 3/8 offset satin nickel. I bought mine at San Diego Hardware but they have them at Home Depot as well.


Next Project 
Other than the cabinets, there are two things I've detested about my kitchen since I bought the house: the kitchen faucet and the appliances. Or rather, the dishwasher in particular b/c it's black and because it gets moldy inside. Yuck! I can't update all my appliances right now, but this week I'm going to buy a stainless dishwasher. I think it will look really nice with the new hardware and paint. And it won't be loud or stinky.

I already bought a new, tall faucet with a pull down nozzle this weekend so I hope to get that installed this coming weekend. Once these things are done, my updated kitchen will go a long way towards making my like my house again. I haven't been very happy with it for the past year, mostly because I'm embarrassed by my front yard. By then end of this year, I'm going to get it landscaped, even though I hate how much it's going to cost =( But at least I'm no longer embarrassed by my kitchen!!

Final After Pictures (December 2011)
This post gets a lot of traffic (apparently lots of you are researching before and after painted kitchen cabinets - I know I did!). Well, it bugs me that this post has the picture with my old dishwasher, so here's how the kitchen looks after I finished installing the dishwasher and new faucet):

Final After picture with painted kitchen cabinets, new dishwasher and new faucet. Ta-da!