Saturday, July 28, 2012

Evolution of a Back Porch

Looking through my iPhoto albums, I was amused by my early attempts to make my back patio appealing. And by what shithole my house was when I bought it - good thing I saw the diamond (ok, cubic zirconia) in the rough!
Day of walk through in June 2009. I think the stump in the yard was what sold me.
Rake the dirt yard, add some kitchen chairs and a few spikey, colorful flowers and presto-chango!
Still a shithole.

Do the cute flowers distract you from the peeling paint??
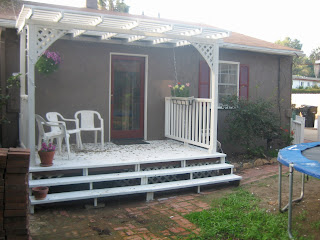
Porch 2.0 - removed the front railing and repainted. So happy. November 2010.

Final product, July 2012. New inviting chairs & pillows, more plants and a lawn!!
Now I actually sit out here.

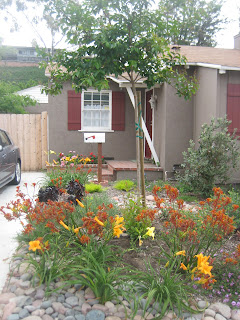
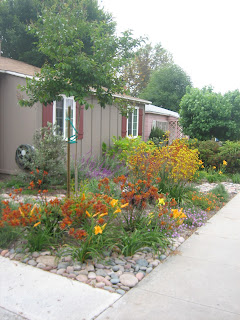
Return of the spikey flowers. I love these things.
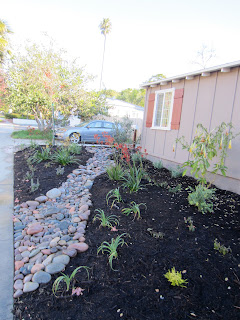
Close up of the succulent planter I put together that's on the front of the porch. Plus a peak at what the dirt yard was transformed into.

Thursday, July 26, 2012

Laying a Brick Paver Patio

One of the projects I've had on my list for the past year was to put some of my old brick pavers to use (the ones that were pulled up in the backyard when I landscaped) and build a nice, small patio to store my garbage bins on. One of those projects that is boring to everyone else, but has made me so happy ever since I finished it.
Repurposed, used brick pavers make for a cute patio.
Previously, the bins rested on a bed of jagged little landscaping rocks which are not only ugly, but they were difficult to roll the bins on and off of and even worse, so many huge ugly weeds sprout up through the rocks. This is one of the few times, and it turns out the ONLY part of my house, that I don't have a before picture of.

How to Lay Pavers - The Non-Professional's Guide
This is the "I just need it to function" method. If I were serious, I would have made the ground completely level and used string and sticks and levels to make sure. And used something to cut a few bricks to size so my border doesn't have a gap at the back.

Instead, I worked off memory from a 3 part YouTube video I watched over a year ago on how to lay brick pavers and decided to see how it went. Because it was just too hard to spend 5 minutes watching the videos again.

Step 1: Prep Work
I paid my landscaper to dig out about four inches of dirt and rock because he does a good job of eyeballing level. And I learned when I had to dig a hole to bury my cat Boo that I hate digging.


Step 2: Lay Bricks
After I had a level, clear areas to work in, I poured about a quarter inch of landscaping sand (about $3/bag - I needed 6 bags for my roughly 5x7foot area). I didn't do it all at once - I just poured a little bit for the immediate area I was working on b/c it's nicer to work with while it's damp. Yes, it comes out of the bag damp. And yes, I'm just now realizing as I type this that I could have used the hose to re-moisten it if I had poured more.

Next I laid a border with my larger 12x12 pavers, tapping each into place with a rubber mallet.

Then I figured out a simple pattern for the brick sized pavers, again, using the mallet to tap them as close together as possible.

Last, I put a border around the border (see pictures) to try and hold everything in place.

Click to enlarge - left side has sand in
the gaps, right side still needs sand.
Step 3: Add Sand
The final step is pouring sand into all the gaps and using a broom (and my hands) to brush it into the spaces between all the bricks. I did this twice - I noticed after a day that the first round of sanding had settled and I had more gaps again.

Step 4: Curb Appeal
Ok, that wasn't the FINAL step. The final step was putting mulch/tanbark around the border b/c I didn't build all the way to the fence (because my landscaper didn't clear that far).

The final product:
It's done! I really like how the aged and used bricks look.

The brick patio at work - a nice home for all my garbage bins.
Total Cost: About $20 for bags of sand and $11 for a rubber mallet. Materials were free, however if you have to buy new pavers, these are about $.60/each.


Tuesday, May 29, 2012

Landscaping - 6 Month Check Up

This one will be short on words, heavy on pictures. I've loved driving up to my house since I had the front yard done in December 2011, but since spring arrived, I've loved it even more! The yard has been so vibrant and beautiful with all the plants in bloom. See for yourself:

Front yard - May 2012. Spring has sprung!!
Still waiting for the crepe myrtle to bloom (the tree in the foreground)

Backyard - Install vs. 6 Months Later (click images to enlarge)
Apologies for not taking pictures in the same lighting!

Backyard - January 2012 - right after install

Backyard May 2012 - new chairs! No lemons right now though.
Backyard - January 2012, right after install
Backyard - May 2012. Not a huge difference yet - the backyard gets
less sun so except for the Kangaroo's Paws, things aren't growing quite as fast as the front yard.
Front Yard - Install vs. 6 Months Later
Front riverbed - December 2011

Front yard riverbed - May 2012

Front walkway - December 2011

Front walkway - May 2012

Front walkway - December 2011

Front yard - May 2012, dog walkers' view.

Front yard - December 2011 - right after install

Front yard - May 2012, driveby view.

Read the original post about my backyard makeover
Read the original post about the front yard landscaping

Thursday, May 17, 2012

Refinancing My House

I've owned my home for almost three years and I got a decent rate on my home loan at 5.25% for a 30 year fixed rate loan, but it could have been better (rates actually went up the month before I bought and I hadn't locked the rate yet).

In January, I contacted my mortgage specialist and found out what my refinancing options were. I decided to go with a No Cost 30 Year Fixed Rate loan at 4.25% which will lower my monthly payment by about $260 - woo-hoo!

It's called "No Cost" because you accept a slightly higher rate in return for the the closing costs of the loan being paid by the bank. However it's not completely "no cost" - you have to pay for an appraisal ($475) and I temporarily had to deposit $2000 into my new escrow account until my current lender sends me a check for what I currently have in escrow and essentially pays me back.

As mentioned, I had to get an appraisal in order to refinance, so I got that ball rolling in late February. I was a little nervous because appraisals have not been that great lately and many homes are getting appriased below their value. The fact that my house is a short sale and I bought it for cheap (by California standards) made me slightly less nervous because I couldn't imagine them appraising it below what I paid. I don't know why, but I feel weird about writing what I paid for my house online, so sorry folks.

My appraisal came back (eventually...there was some drama and a redo) and it was appraised at $25,000 above what I paid for it which made me happy (I've put about $16k into improvements so I would have liked to see a little higher than that). I think my house is worth more than what that final appraisal is, but I'm not trying to sell right now so I was just stoked it wasn't below what I paid which is what other people are experiencing. But I already told you it was cheap, so I really have nothing to complain about.

Refinance Bonuses
So besides getting a lower mortgage rate and dropping my monthly payment, because of my house being appriased for more than I paid for it, I now officially own enough of my home to not have to pay mortgage insurance every month. Second Woo-hoo of this post! So my monthly payment drops even more. Which means: hello surf trips!!


Both pictures - Cabo San Jose, Mexico - March 2012.

My refi took a few months and finally wrapped up at the end of March. The second bonus of my refi is that I got one month off from mortgage payments! I didn't know what to do with all that extra money so I moved it to my savings account really quick (you know, the Surf Trip Fund) before I was tempted to spend it on things I don't need, like more clothes, shoes, or another surfboard. Although I'm going to use some of it to buy myself a sweet mid century modern arm chair. I just have to wait until I run across the perfect one. I wanted this one, but was two days too late and someone else bought it first - boo.

My dream mid-century modern arm chair.
The next time I post, it will be to give you an update on how awesome my yards are looking now the that plants have matured and spring as sprung and put everything in bloom.


Tuesday, February 28, 2012

Impulse Buy, Lazy Cat and Christmas Pics

This is a short, disjointed post with some random eye candy.

I stopped by Target to buy shampoo and cat liter and, as is the fate of all who enter Target, I left with more than I expected. Including this awesome white, gray and mustardy-yellow tablecloth that I picked up on clearance for $12.


I put it in the breakfast nook and it goes pretty well with my walls and curtains. Added bonus: it conceals the bench which is due for reupholstering, something that is pretty low on my home improvement list.

Surfing
I haven't been posting much because for the past 2.5 months, I've been surfing like a madwoman. The conditions in San Diego have been really consistent and fun leaving little time for home improvement projects! Here's a random surf-related picture I took in La Jolla of some strange Lifeguard box.

Cats
My cat Jackson, doing what he does best:


Christmas 2011
Just because, here's what Christmas looked at my place in 2011.

Christmas 2011 portrait with my volleyball girlfriends at my 2nd Annual Girls Night In Holiday Celebration.


Wednesday, January 11, 2012

Backyard Makeover

After finally coming to terms with the fact that DIY Network's "Yardcrashers" was never going to accost me in my local home improvement store and offer to do my yard for free (mostly because I don't live within 25 miles of Los Angeles or wherever they film), I plunked down some dough to have my backyard landscaped.


Before and After
I'll start with the money shot, but there are way more before and afters at the end, including the true before and afters from when I first bought my house. I'll do an update in 6 months after the plants have matured, spread out, and are hopefully all in bloom!

Also, I have to say, it was glorious to take off my shoes and step on my new lawn the day it was installed. It is SO SOFT. I know that will go away after it's been mowed a few times, but man I love my fresh grass right now!

Backyard the day before landscaping began.


Backyard after (January 6, 2012). And yes, this means I sold the
trampoline (to two very stoked 20-something boys from Pacific Beach).
Please note that the brick walkway on the right is now even!!

If you're a regular reader, you know I had my front yard done just a couple weeks ago; you can read about that here. Then the first Monday after Christmas, my landscaper Jeff Raymond moved on to the backyard because I decided to spoil my house for Christmas this year. The backyard was a little more work since lots of demo and ground leveling had to be done, plus irrigation needed to installed but it still only took about 5 days total.


The Plan
I had a maximum budget of $4000 for the backyard, so we kept it simple (and thanks to my friend discount from Jeff, I got more done than I could have with anyone else as there was a decent amount of labor and parts required for the irrigation sysem).

How my yard used to look in the summer.
Right side of yard where pavers and flagstone was
(the flagstone is left of the pavers, but covered
in dirt in this picture).
My friend Krista Percival (kplandscapedesign.com) had created an amazing, surf-inspired design for my backyard but unfortunatley I couldn't afford it (it probably would have cost twice the entire budget I had for the front AND backyards). I hope to one day, in a future home, have a surf-inspired backyard, but for this house, which I don't expect I'll be in for more than a few more years, it didn't seem wise to spend a lot of money on a very personal backyard design. Instead I've decided on something more generic that will appeal to a broad range of future buyers (and won't be a total waste of money if they tear it all out when they move in). 

The plan was to remove the weird, poorly laid flagstone patio and uneven brick walkway on the right side of the yard (see picture above) then to create a grass area in the middle with a garden area that curved along the back and down the right side.


The Plants
Jeff used all the same plants as he used in my front yard (view list in this post) to carry the design through to the back of the house. The only additional plants were:
  • lemon tree
  • purple hopseed bush
  • euryops ("daisy bush" - these were chosen because they grow fast and will do a good job masking the fence once they fill in)
Jeff also reused all the granite rocks that a previous owner had used when they first did the yard. He used those to make my new garden area perimeter and also put some of the larger ones in random spots in the garden bed which I really like. Although I still have a ton (probably literally) of these rocks left:

All the leftover granite...call me if you have a project!
You may remember I used this spot to store another pile of rocks.


More Before and After

Here is more backyard before and after porn for you.

My backyard before, in the summer of 2009. This is when it was in decent condition b/c at least the weeds were dead and not knee high.
This was what I used to call "excellent" condition for my backyard. Twice a year I'd clear all the weeds, rake the ground, and have a lovely, neat dirt plot to admire. It never looked better than this.
My yard today, January 2012. Same pic from beginning of this post. I love my cute little yard!
Back corner before

Back corner after. Sadly, the tree in the corner died a year after I moved in, but I keep it b/c it provides a nice screen from the neighbors on the hill.

 My lemon tree and an example of some of the reused granite inside the garden beds.
Back wall before, again, summertime dry and dead look and in need of a raking.
Back wall after. check out the well groomed tree - I did that part myself about a month
before landscaping started! Ok, I admit it. I gave the tree a bowl haircut.
Looking from back corner into the yard before....
....and same view after! Don't you want to come over and have a lemonade with me now? This is my favorite after picture.

Side of garage the day I bought the house, June 2009. I hate roses.
Side of garage, January 2012. No more roses (kangaroo paws instead) and no more
single, stupid shutter on the window.
Back patio view the day I bought the house, June 2009.


 Wrong angle, but back patio after. In December 2010 I had the front rails removed
and the stairs expanded all the way across. I just need to put a some potted plants out.


Same pic from earlier in the post, but compare to the below. This was in 2010 - check out the growth on the palm! and we removed the weird stone table coming out of the fence.

 
View down the right side of the yard. 
Read about my front yard makeover which I did a month before this project.